How do I install roof insulation batts in my Australian home?

Roof insulation batts are a popular choice among Australians for their homes due to their effectiveness in maintaining optimal indoor temperatures, reducing energy costs, and promoting environmental sustainability. This article will guide you through a detailed, step-by-step process of installing roof insulation batts in your Australian home, covering topics from choosing the right insulation to maintenance and safety concerns.

Understanding Roof Insulation Batts

Before delving into the installation process, let’s understand what roof insulation batts are and their benefits. Batts are pre-cut sections of insulation that can be made from various materials, including fiberglass, polyester, or wool. They are designed to fit between the joists in your roof and work by trapping pockets of air, creating a thermal barrier that prevents heat transfer, and helps maintain an ideal indoor temperature.

Insulation batts not only help to keep your home warm in winter and cool in summer but also contribute to reducing your energy costs. They can also provide soundproofing benefits and contribute to a more sustainable environment by reducing your reliance on heating and cooling systems.

Choosing the Right Insulation

There are several factors to consider when choosing the right insulation for your home. The choice can vary based on your geographical location, type of construction, and personal preferences. Australia has various climate zones, and accordingly, the Building Code of Australia recommends different insulation R-values (a measure of thermal resistance) for each zone.

Ensure you choose the insulation batts that meet the recommended R-values for your climate zone. Also, consider factors such as the product’s life cycle, environmental impact, fire resistance, and soundproofing capabilities. It’s best to consult with a professional to ensure you’re making the right choice.

Tools and Materials Required

Before you begin the installation process, gather all the necessary tools and materials. You’ll need:

  • Insulation batts
  • Utility knife
  • Tape measure
  • Stapler
  • Safety gear including gloves, dust mask, and safety goggles
  • Ladder
  • Portable light (if the attic doesn’t have enough lighting)
  • Installation Process

Step 1: Preparation

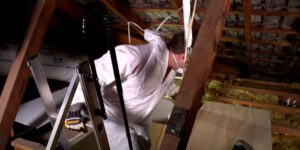
Before beginning, ensure the roof space is dry and clean. Any dampness or leaks could compromise the insulation’s effectiveness. Also, remove any old insulation if it’s damaged or ineffective. Ensure that you’re wearing appropriate safety gear to protect against dust and fiberglass particles.

Step 2: Measuring the Space

Measure the distance between the joists and the depth of the space you’re insulating to determine how many batts you’ll need. The batts should fit snugly between the joists. If the batts are too small, they won’t insulate effectively, and if they’re too big, they could be compressed and lose their insulating properties.

Step 3: Cutting the Batts

Using a sharp utility knife, cut the batts to fit the space. It’s better to cut them a bit larger than your measurements to ensure a snug fit. Never compress the batts, as this can reduce their effectiveness.

Step 4: Placing the Batts

Start at the far end of the attic and work your way towards the entrance. This way, you won’t need to walk over the batts you’ve already installed. Carefully place the batts between the joists without leaving any gaps. Make sure the batts aren’t blocking any soffit vents to maintain proper attic ventilation.

Step 5: Insulating Around Obstacles

For areas around obstacles such as pipes or electrical boxes, cut smaller pieces of insulation batts and fit them around the obstacles. Ensure not to cover any light fixtures or other heat-generating objects that could potentially cause a fire.

After Installation Care

Once the installation is complete, regularly check your insulation for any signs of damage or dampness. If you find any wet insulation, it’s important to identify the source of moisture and rectify it before replacing the batts.

Safety Concerns

Safety is paramount when installing insulation batts. Always wear protective clothing, including a dust mask, goggles, and gloves, to protect yourself from insulation fibers. Be cautious of any electrical wiring, and never cover any heat-emitting devices as it could pose a fire hazard. If you’re not comfortable with the installation process, it’s advisable to hire a professional to ensure safe and efficient installation.

Conclusion

Installing roof insulation batts in your Australian home can greatly improve your comfort and reduce your energy costs. While the process might seem intimidating, with the right tools, materials, and a detailed guide, it is certainly manageable. Remember, it’s important to prioritize safety throughout the process and ensure the insulation is properly maintained post-installation for optimum effectiveness.


How do I choose the right roof pitch for my Australian home?

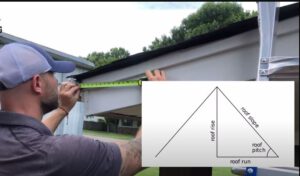
Choosing the right roof pitch is a crucial aspect of designing or renovating your Australian home. The pitch of your roof can significantly impact the aesthetic appeal, durability, and practicality of your home. But what factors should you consider, and how do these factors apply to the Australian context? Here’s a comprehensive guide to help you decide.

Understanding Roof Pitch

Roof pitch, or slope, refers to the steepness or incline of your roof. It’s generally expressed as a ratio of the vertical height (rise) to the horizontal distance (run), typically in the format of X:Y where X is the rise and Y is the run.

The Importance of Roof Pitch

Roof pitch is not just an architectural design element but also has practical implications. It can affect:

  • How well your roof sheds rain and debris: A steep roof pitch means that water and debris can run off more quickly.
  • The longevity of your roof: With a steep roof pitch, it’s harder for rain to seep in through the shingles or tiles, which can extend the life of your roof
  • How easily you can access your gutters and other elements of the roof: A steeper roof can be more difficult to access for maintenance or repairs.
  • The internal space and potential for attic conversion: A steeper roof can give you more internal space, which could be used for an attic conversion or storage.

The aesthetics of your home: Different roof pitches can create different ‘looks’ and styles to the exterior of a house.

Factors to Consider When Choosing Roof Pitch

Climate

In Australia, the climate varies significantly across regions, and it’s one of the main factors influencing the choice of roof pitch.

For areas with high rainfall, a steeper pitch can be beneficial as it allows rainwater to drain off more quickly, reducing the risk of water ingress and potential damage. Similarly, in snow-prone regions like the Australian Alps, a steeper pitch helps shed snow, preventing build-up that could lead to roof damage.

Conversely, in drier areas or regions with high winds, a lower pitch could be preferable. Lower pitched roofs offer less resistance to wind, reducing the potential for wind damage.

Design and Aesthetic

Your choice of roof pitch can have a substantial impact on the overall aesthetic and design of your home. Steeper pitches can lend a traditional, classic look to your home, while lower pitches generally give a modern, minimalist appeal. Ensure the roof pitch complements the architectural style of your home and fits into the broader neighbourhood aesthetics.

Building Regulations and Guidelines

Local building codes, council regulations, and neighborhood guidelines can also influence your choice of roof pitch. These rules often specify minimum and maximum roof pitches for different types of roofing materials and styles. Ensure you’re familiar with these guidelines before deciding on your roof pitch.

Roofing Material

The roofing material you choose can determine the minimum and maximum pitch you can have for your roof. For example, materials like slate and tiles typically require a steeper pitch, while metal roofing can be installed at a lower pitch.

Internal Space

The pitch of your roof impacts the internal space of your home. A higher pitched roof could provide additional space for an attic or loft conversion, offering added utility.

Cost

Finally, cost is an important consideration. Higher pitched roofs require more materials and can be more labor-intensive to install, thus potentially costing more.

Working with Roofing Professionals

Given the complexity of choosing the right roof pitch, it can be beneficial to engage professionals. Architects, designers, and roofing contractors bring expert knowledge about design aesthetics, material suitability, and local regulations, providing invaluable advice tailored to your specific circumstances.

In conclusion, the choice of the right roof pitch for your Australian home is a multifaceted decision, dependent on various factors. By considering your local climate, desired aesthetic, local regulations, chosen roofing material, space needs, and budget, you can make an informed choice that enhances the appeal, durability, and practicality of your home. Remember, collaboration with roofing professionals can greatly assist in this process, helping you achieve the optimal solution for your unique needs.

How do I choose the right gutter system for my Australian roof?


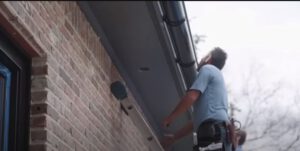
Gutters are one of the most important components in a roofing system, providing protection against water run-off and helping to prevent water damage. Choosing the right gutter system for your roof can be an overwhelming process due to the range options available.

In this article, we will discuss the different types of gutters available in Australia and how you can choose the right system for your roof.

Why Are Gutters Important?

Gutters are important for several reasons, including:

Protect Roofs From Run-Off Water

Gutters are designed to collect and divert rainwater away from your home’s roof, walls and foundation. This helps protect the structural integrity of your property by preventing water damage caused by run-off.

Protect Basements From Flooding

Gutters also play an important role in protecting basements from flooding. By diverting water away from the foundation of the property, gutters help to reduce the chances of a flooded basement occurring.

Prevent Erosion

Gutters also help to prevent erosion by directing rainwater away from your property and preventing it from pooling around the foundation. This helps protect your home’s land and soil integrity while also reducing the chances of plants and grass being damaged.

Prevent Ice Dams

Gutters can also help prevent ice dams from forming on your roof by allowing water to be diverted away from the edge of the roof before it has a chance to freeze. Ice dams are a common problem in colder climates and can cause significant damage if not addressed quickly.

Reduce Fire Risk

One of the little-known benefits of having gutters is that it can help to reduce the risk of fire by preventing burning embers from potentially landing in your roofing material and setting a fire. By having a gutter system, you are helping to ensure that any debris or burning embers which land on your roof will be routed away to safety.

Protect Siding

Having gutters is also an important part of protecting your siding. By having a gutter system in place, you will be ensuring that any runoff water from the roof is diverted away from the walls and foundations of your home. When water pools against your siding it can cause staining, rotting and other forms of damage including mold and mildew.

Types of Gutters For Your Australian Roof

When it comes to gutters, there are a few different materials and types available in Australia. Let’s take a look at the most commonly used options:

Steel Gutters

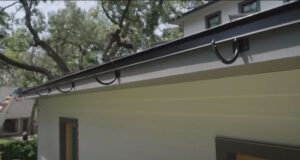
Steel gutters are one of the more popular choices for homeowners in Australia. They come pre-painted, which makes them very easy to install and maintain. Steel gutters are also very strong and durable, so they will last a long time when properly cared for.

Aluminium Gutters

Aluminium is another great option for your gutter system. Aluminium gutters are lightweight yet still durable enough to stand up to the elements over time. They are available in several different colors and styles, so you can pick the one that best suits your home’s aesthetic.

Vinyl Gutters

Vinyl gutters are an affordable option for those looking for a low-maintenance solution. They come in various colors and sizes and have a high resistance to rusting or corrosion. Vinyl gutters also have a long lifespan and are easy to install.

Copper Gutters

If you’re looking for a durable yet elegant option, copper gutters may be the perfect choice. Copper gutters stand up well to all types of weather conditions, making them an ideal choice for many homeowners. They also provide an attractive look that can add value to your home.

How To Determine The Right Gutters

When deciding which type of gutters are best for your home, you should consider several factors. These include the size of your roof, the type of material used, and the area’s climate. Additionally, you should factor in your budget and how long you plan to stay in the home. It’s important to choose gutters that will last and be able to withstand the elements.

Installation

Once you have decided on the type of gutters, it’s time to begin installation. Hiring a professional is recommended to ensure that your gutters are properly installed and functioning correctly. Make sure to follow all safety precautions when installing the gutters, as working on a ladder and on top of a roof can be dangerous. A professional will have the experience to install your gutters properly and quickly.


How do I identify and fix a sagging roof in my Australian home?

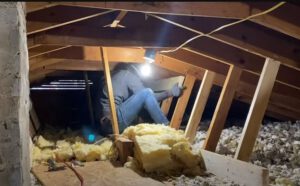
A sagging roof is a common problem that can occur in Australian homes. This issue is not only unsightly, but it can also compromise the structural integrity of the home and pose a safety risk to the occupants. In this article, we will explore how to identify and fix a sagging roof in an Australian home.

Identify the Problem

The first step in fixing a sagging roof is identifying the problem. Look for signs of a sagging roof, such as visible dips or unevenness in the roofline, cracks in walls or ceilings, or doors and windows that no longer open or close properly. These can indicate that the roof is bearing too much weight or that the support structure has weakened over time.

It is important to determine the cause of the sagging roof before attempting any repairs. The cause could be anything from improper installation to water damage, termite infestation, or deteriorating materials.

Fix the Support Structure

If the cause of the sagging roof is a weakened support structure, it is important to fix this issue before repairing the roof itself. You may need to add additional supports or replace damaged ones. This requires a professional contractor with experience in roofing and carpentry.

The contractor will assess the support structure and determine if there are any areas that need reinforcing or replacing. This may involve cutting into the roof and installing new beams or columns. Once the support structure is fixed, the roof can be repaired.

Repair the Roof

Once the support structure is fixed, you can begin repairing the roof. The type of repair needed will depend on the cause of the sagging roof. For example, if the issue is due to water damage, you may need to replace damaged tiles or shingles and apply a waterproof membrane to prevent further damage.

If the sagging is caused by rotting wood, the damaged wood will need to be removed and replaced. This requires a professional contractor with experience in carpentry.

If the roof is beyond repair, you may need to consider a complete roof replacement. This is a major project that requires careful planning and execution. A professional roofing contractor can assess the roof and provide recommendations for the best course of action.

Prevention

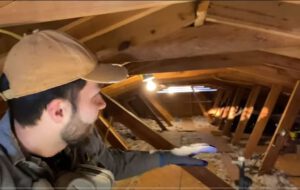
Prevention is key to avoiding a sagging roof in the future. Regular inspection and maintenance can help identify potential issues before they become major problems. Be sure to inspect your roof at least twice a year, after heavy rain or wind, and after any construction work on your home.

Maintain good ventilation in your attic to prevent moisture build-up, which can weaken the support structure. Ensure gutters and downspouts are clear of debris and functioning properly, so water does not accumulate on the roof.

Conclusion

A sagging roof is a serious issue that requires immediate attention to prevent further damage and ensure the safety of the occupants of the home. By identifying the problem, fixing the support structure, repairing the roof, and taking preventive measures, you can avoid a sagging roof in the future and ensure the longevity of your home’s roofing system. It is important to work with a professional roofing contractor with experience in identifying and repairing sagging roofs for the best results.


How do I ensure proper ventilation in my Australian attic space?

Proper ventilation is crucial for maintaining a healthy and functional attic space in Australia. Inadequate ventilation can lead to a buildup of heat, moisture, and pollutants, causing various issues such as mold growth, poor air quality, and structural damage. To ensure the longevity and usability of your attic space, it is essential to implement effective ventilation strategies. In this article, we will explore the key considerations and methods to ensure proper ventilation in your Australian attic space.

Understand the Importance of Attic Ventilation

Attic ventilation plays a vital role in maintaining a balanced airflow within the space. It allows for the exchange of stagnant air with fresh air from the outside, preventing the buildup of heat and moisture. Proper ventilation helps regulate temperature, reduces the risk of moisture-related problems, and promotes better air quality. Additionally, it can contribute to energy efficiency by minimizing heat transfer between the attic and the rest of the house.

Evaluate Existing Ventilation

Before implementing any changes, it is important to assess the current ventilation system in your attic. Check for the presence of vents, including soffit vents, ridge vents, gable vents, or turbine vents. Determine if they are functioning properly and if they provide adequate airflow. Evaluate the balance between intake vents (allowing fresh air in) and exhaust vents (allowing stale air to escape) to ensure proper air circulation.

Consider Climate and Environmental Factors

The climate in different regions of Australia varies, and considering local weather patterns and environmental factors is crucial when planning attic ventilation. Regions with high humidity levels, such as coastal areas, may require additional ventilation to mitigate moisture-related issues. Understanding the prevailing wind direction can help determine the best locations for intake and exhaust vents, ensuring efficient airflow.

Incorporate Intake and Exhaust Vents

A well-designed ventilation system requires a balanced combination of intake and exhaust vents. Intake vents, such as soffit vents or eave vents, are typically located at the lower portion of the attic and allow fresh air to enter. Exhaust vents, such as ridge vents, gable vents, or powered attic fans, are positioned at the highest point of the roof or along the roof slope to facilitate the escape of hot air. Installing a combination of these vents promotes natural airflow and ventilation.

Soffit Ventilation

Soffit vents are an essential component of attic ventilation systems. They are installed in the eaves or soffits of the roof, allowing cool air to enter the attic space. Soffit vents are typically paired with ridge vents or other exhaust vents to create a continuous airflow. It is important to ensure that soffit vents are not obstructed by insulation or other materials, as this can impede airflow.

Ridge Ventilation

Ridge vents are an effective way to provide exhaust ventilation in the attic. They are installed along the ridge line of the roof, allowing hot air to escape. Ridge vents work in conjunction with intake vents to create a natural convection effect, where cool air enters from the intake vents and hot air rises and exits through the ridge vents. Proper installation is crucial to ensure a watertight seal and optimal airflow.

Consider Attic Fans

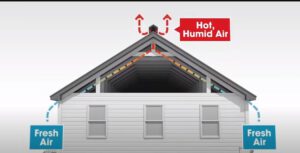
In certain cases, especially in areas with limited natural ventilation or excessive heat buildup, attic fans can be installed to improve airflow. Attic fans, powered by electricity or solar energy, help expel hot air and promote air exchange. They can be used as exhaust fans or in combination with intake vents to enhance ventilation effectiveness. However, it is important to properly size and position attic fans for optimal performance.

Insulation Considerations

When addressing attic ventilation, it is important to consider the impact of insulation. Insulation is vital for maintaining energy efficiency and preventing heat transfer. However, improper installation of insulation can block airflow and hinder ventilation. Ensure that insulation materials are not blocking or covering vents. Use proper insulation baffles to maintain a clear pathway for air movement from intake vents to exhaust vents.

Seek Professional Advice

Achieving proper attic ventilation can be a complex task, and seeking professional advice is highly recommended. Consult with a qualified roofing contractor, architect, or ventilation specialist who can assess your specific attic space, consider local regulations and climatic factors, and provide expert recommendations for the most suitable ventilation system for your needs.

Conclusion

Proper ventilation in your Australian attic space is essential for maintaining a healthy and functional environment. By understanding the importance of attic ventilation, evaluating existing ventilation, considering climate and environmental factors, incorporating intake and exhaust vents, utilizing soffit and ridge ventilation, considering attic fans when necessary, addressing insulation considerations, and seeking professional advice, you can ensure optimal airflow and prevent potential issues associated with poor ventilation. By implementing effective ventilation strategies, you can create a well-ventilated attic space that promotes air quality, minimizes moisture-related problems, and contributes to the overall comfort and longevity of your home.


How can I prevent moss and algae growth on my Australian roof?


Moss and algae growth on the roof is a common issue faced by many homeowners in Australia. While they may seem harmless at first, if left untreated, these organisms can cause significant damage, leading to expensive repairs or even a full roof replacement. This article offers in-depth guidance on how to prevent moss and algae growth on your Australian roof. We will delve into understanding what causes this growth, prevention methods, appropriate cleaning techniques, and long-term maintenance strategies.

Understanding Moss and Algae Growth

Moss and algae thrive in damp, shaded environments with ample access to sunlight for photosynthesis. Their spores are airborne, and once they land on a suitable area, such as your roof, they start to grow. Moisture is the key ingredient for their survival. The frequent rainfall and humid weather in many parts of Australia, particularly coastal regions, provide the ideal conditions for moss and algae.

Roofing materials also play a role in promoting growth. For instance, limestone fillers used in asphalt shingles are a food source for Gloeocapsa magma, a species of cyanobacteria that causes black streaks on roofs. Composite, wood, and tile shingles tend to hold more moisture than metal ones, making them more susceptible.

Prevention Methods

  • Improve Sunlight Exposure: Sunlight is a natural moss and algae deterrent. If certain parts of your roof are shaded by trees or buildings, consider trimming back branches or finding other ways to increase sun exposure.
  • Clean Gutters Regularly: Clogged gutters can cause water to back up and seep into the roof, creating a perfect environment for moss and algae. Ensure your gutters and downpipes are clear of leaves, twigs, and other debris. Regular checks, especially after a storm or during autumn when leaf fall is abundant, can significantly help.
  • Install Copper or Zinc Strips: When it rains, particles from copper and zinc strips wash down the roof, creating an environment that’s hostile to moss and algae. Installation at the roof’s peak can provide a long-term solution, but make sure to consult with a roofing professional to avoid any damage.

Cleaning Techniques

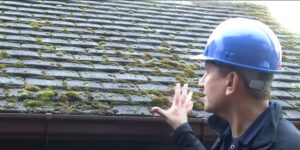
If your roof already has moss or algae, don’t worry. There are several cleaning methods available, both chemical and non-chemical.

  • Pressure Washing: Pressure washing is a commonly used non-chemical technique. However, it must be done carefully as the high-pressure water can damage roofing materials or force water under shingles. It’s recommended to hire a professional with experience in roof cleaning.
  • Soft Washing: This method uses a lower pressure washer and often includes a cleaning solution to kill and remove moss and algae. Again, it’s usually best to hire professionals to avoid any inadvertent damage to your roof.
  • Chemical Cleaning: Various commercial products can effectively kill moss and algae. Look for products that are eco-friendly and designed for use on roofs. Always follow the manufacturer’s instructions. Using a sprayer, apply the cleaner, let it sit for the prescribed time, then rinse it off.
  • Homemade Solutions: If you prefer a DIY approach, a solution of equal parts household bleach and water can serve as an effective moss and algae killer. Remember to protect your plants and lawn from runoff, as bleach can harm them.

Long-Term Maintenance

Regular inspection and maintenance are crucial for keeping your roof moss and algae-free. Clean your roof as soon as you see signs of moss or algae. Keep gutters clear and prune overhanging branches that shade your roof.

Consider applying a moss and algae-resistant treatment. Some products can be sprayed on the roof after cleaning to inhibit growth.

Alternatively, when it’s time to replace your roof you can choose a product that is naturally resistant to moss and algae growth. Copper, zinc, or other metal roofs are often effective in minimizing the risk of future problems.

Before undertaking any maintenance task on your roof, make sure you understand proper safety procedures. Wear shoes with rubber soles for good grip and if possible, get someone to help you.

Finally, check with your local building inspector to make sure your roofing project complies with any local regulations. Taking the time and effort to maintain your roof will save you money in the long run by prolonging its life and keeping it looking great for years to come.